Attiny

Microcontroller Attiny13/85! (555 is retro)


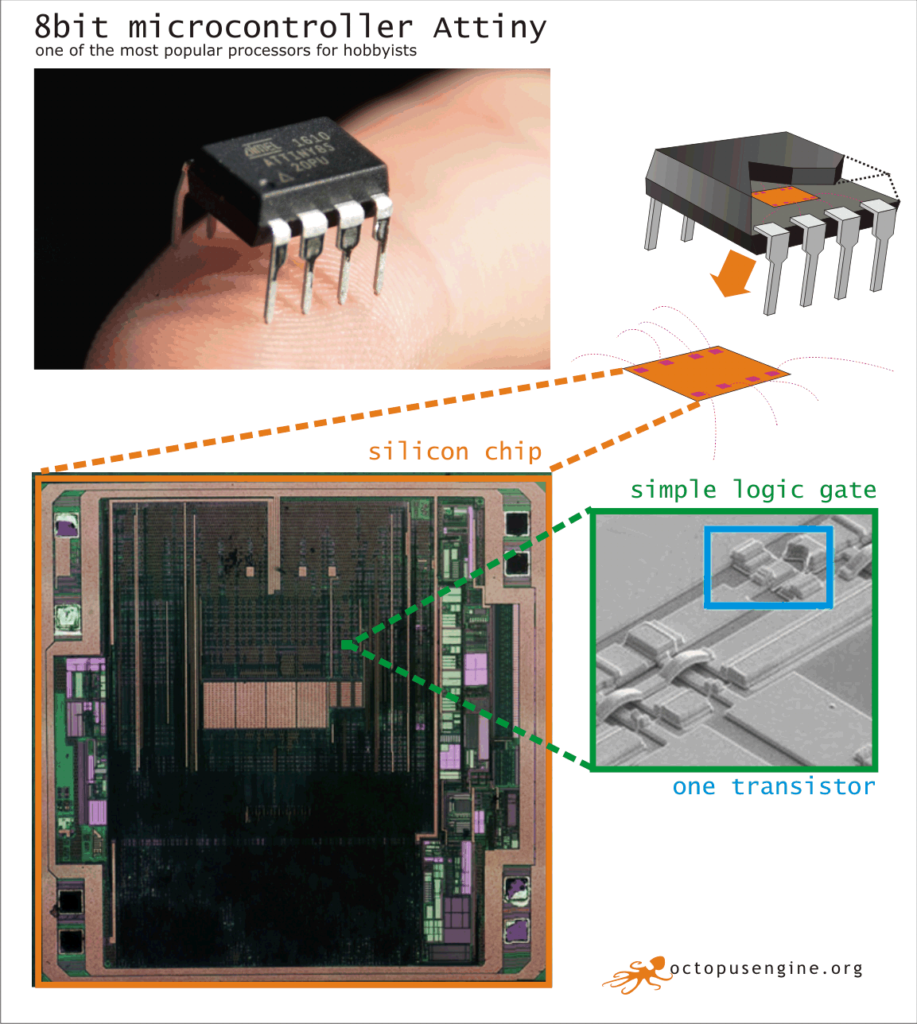
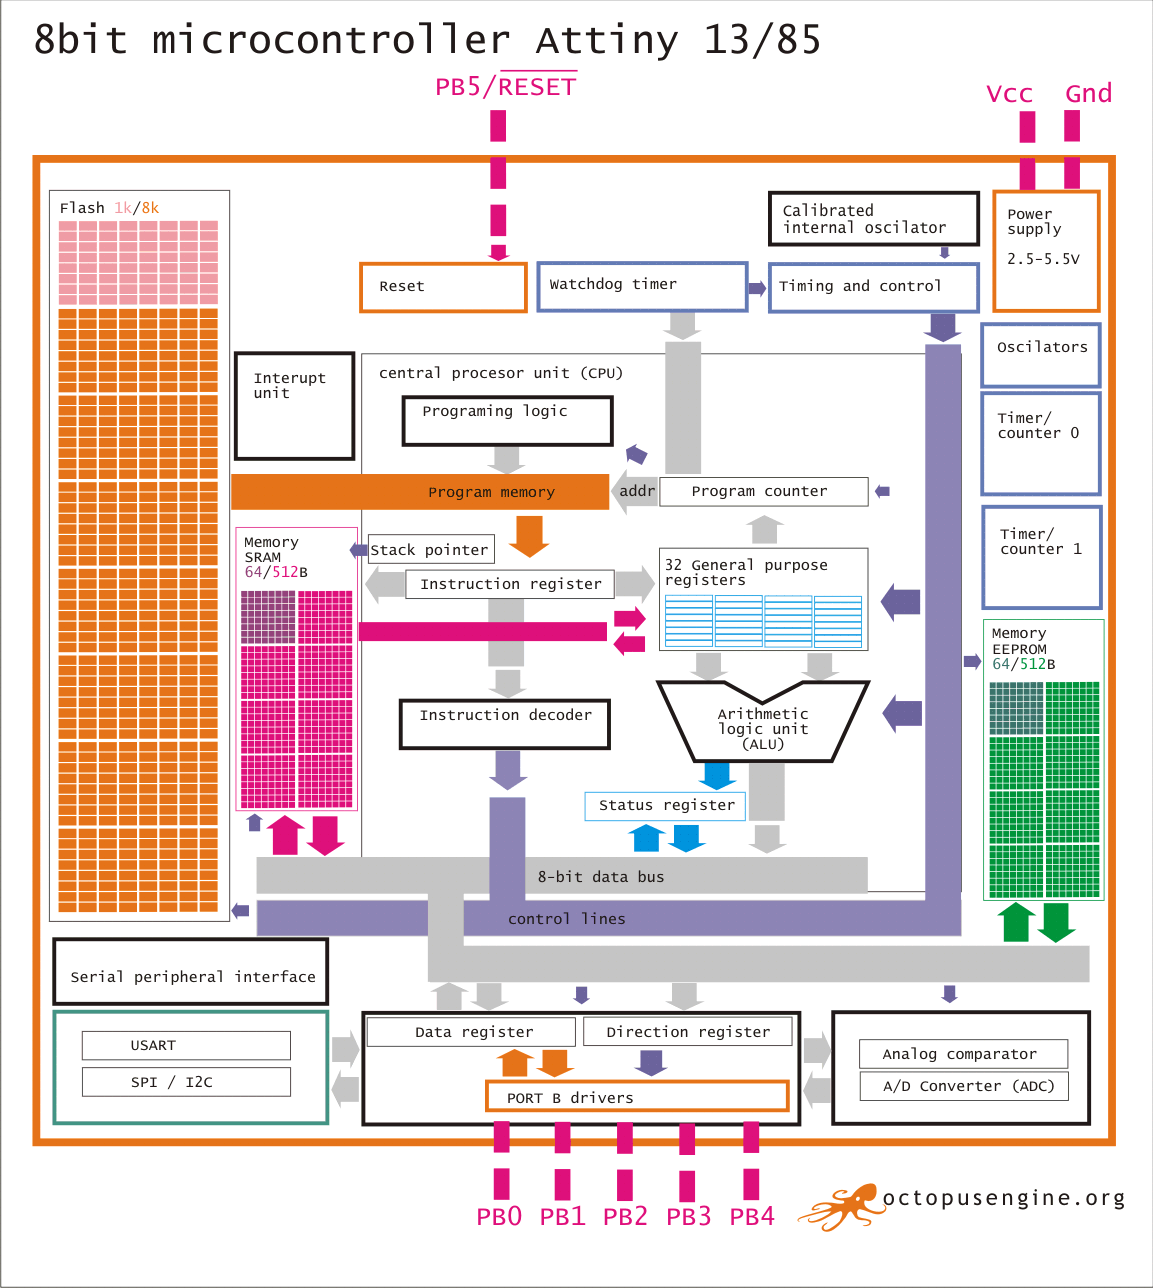
Attiny85: The high-performance, low-power Microchip 8-bit AVR RISC-based microcontroller combines 8KB ISP flash memory, 512B EEPROM, 512-Byte SRAM, 6 general purpose I/O lines, 32 general purpose working registers, one 8-bit timer/counter with compare modes, one 8-bit high speed timer/counter, USI, internal and external Interrupts, 4-channel 10-bit A/D converter, programmable watchdog timer with internal oscillator, three software selectable power saving modes, and debugWIRE for on-chip debugging. The device achieves a throughput of 20 MIPS at 20 MHz and operates between 2.7-5.5 volts.


A microprocessor is a computer processor that incorporates the functions of a central processing unit on a single integrated circuit.
History:
1960 – CPU (MOS LSI chips – a few hundred transistors)
1969 – Four-Phase Systems (acquired by Motorola in 1981)
1970 – electronics calculators
1971 – Intel 4004 (2300 transistors)
A microcontroller (MCU) is a small computer with simple peripherals on a single integrated circuit.
1977 – Intel 8048
1993 – Microchip PIC16x84, Atmel (NOR flash memory)


https://en.wikipedia.org/wiki/ATtiny_microcontroller_comparison_chart

2018:
Attiny 1614 (16k flash, 2k sRAM)
Attiny 3217 (32k flash, 2k sRAM)


“Big” Atmel for Arduino?

Attiny is better:

oeLAB

Octopus engine LAB – new edition of dev boards:


oeLAB – FIRST BOARD:


oeLAB – BEV BOARD with Raspberry Pi:

IoT Lab

Tickernator


Our friends know, we constantly develop some mysterious smart gadgets. Once we were asked to make a simple machine which shows price of Bitcoin and other cryptocurrencies.
Thus prototype of Tickernator was born – small wooden box with retro seven segment display so you can see the price even from a distance.

Tickernator was popular and we had lot of demand from our crypto-peers. We added more cryptocurrencies and other data (even time – believe it or not).

There were couple of problems we tackled – like how to set up a wifi connection to a device remotely, when we send it to customer.
We also started to play a bit more with various designs. Now we also make steel boxes (black or silver) and we can also adjust it with custom design (like logo).

Some clients wanted even more customization – like 3D printed rocket shape box. We plan to offer a full kit of basic elecotrnic components – all set up and programmed.


Big Clown – meetup

We had yet another workshop/hackathon, this time focused on IoT, with moduls from bigclown.cz

#octopusengineClub #hackathon #bigclown #octopusenginelab #iot #oeLAB

A post shared by octopusengine (@octopusengine) on

#octopusenginelab #bigclown #diyelectronics #iot #octopusengineClub

A post shared by octopusengine (@octopusengine) on

We tested Core module kit (connecting gateway + node), which can bet programmed via USB DFU bootloader located in ROM memory or ARM microcontroller and/or debugged via standard 10 pin SWD connector. Core Module is key element of every BigClown node. On the “motherboard” there is integrated security chip, heat sensor and accelerometer. We also had external I2C modules – hygrometer, thermometer, modul with relay and controlling of RGB LED stripe.

It is professional solution not only for home automatization, and also an introduction to broader IoT usage. We went through basic installation, initialization and couple of simple experiments. After connecting Raspberry Pi3 to Raspbian and installing of control software we were able to use MQTT (widely used protocol for IoT)
mosquitto_sub -v -t ‘#
this command “prints” ID of distant node:
>> node/836d19836043/thermometer/0:1/temperature 22.50
LED demonstration:
mosquitto_pub -t ‘node/836d19836043/led-strip/-/effect/set’ -m ‘{“type”:”rainbow”, “wait”: 5 }’

For future we plan adding Python layer and integration with Cryptomat and advanced data transfer for visualisation and interaction in VR.

https://www.bigclown.cz/

data in virtual reality (part 1)

Data are hot goods – everyone wants more of them. We want to visualise and analyse them, the more the better. And why do we need it? To make better decisions.

Our data are always only as good as our ability to make better decision thanks to them. And we believe the visualisation is the key to that.

Right now we are limited to process the data in spreadsheets, more or less complicated dashboards or using mostly 2D charts and lines. Or we can give it to a team of analysts or machine learning algorithm to crunch it for us. But there may be another way.

What if we could see data and interact with them in new way? Imagine that instead of messing around with spreadsheets, you have all the data all around you. Imagine you can move them around, connect them, make them alive in real time using just your hands… now it is possible, thanks to VR.

We in octopus engine are going to make that happen. It’s only the beginning. Frankly, we are not sure yet what the best approach is. But we are determined to figure it out. We are determined to try a lot of crazy stuff, find all the dead ends and have fun along the way.

Our vision is to create data processing tool in VR. It will be intuitive to use for analysts, managers, business owners, engineers and other professionals. It will help you make faster and better decisions and get deeper understanding of data.

– team octopus engine –

“In God we trust. All others bring data.” – W. Edwards Deming

(part 2)

why we use Unity

When Honza started octopusengine, he was thinking about the universal platform to use for VR. One of the options was to create it from scratch.

But sometimes it’s better to focus on important things and outsource the rest to existing solutions.

And because games are the frontier of Virtual Reality, there were two game engines which supported HTC Vive integration – famous Unreal engine, and Unity 3D editor.

From these two, Unity seems to be more useful with comprehensive tutorials and great community. Also it is more versatile, as opposed to Unreal, which is focused mostly on games.

Our VR lab, running on Unity

Right now Unity fits our needs pretty well. Although in the future, we will create our own engine which will support all media.

By the way, if you want to try Unity for yourself, here is a little guide how to start for free:

  1. Install Unity Personal
  2. Get to know Unity Editor basics (tutorials are helpful).For Czech and Slovak speakers join our FB group for Unity
  3. Play around. Learn to use Hierarchy, Asset, Inspector. Create your first Scene, Game and 3D Object. Use some Component and create Material. Adjust position and rotation of Main Camera.
  4. If you are programmer, see our github and learn how to use scripts in Unity.
  5. Test our objZero – add it into a scene and move it around with arrow keys.
  6. Ready for VR? If you have HTC Vive or Oculus Rift headset use VRTK library .
  7. Welcome to the Matrix Neo. Contact us if you want to go deeper down the rabbit hole.

We are sure you will have the basics laid down pretty quickly if you give it a try. Just take a look what our project manager Maťo created after only a couple of hours working in Unity.

Where there is unity there is always victory.  – Publilius Syrus

– team octopus engine –